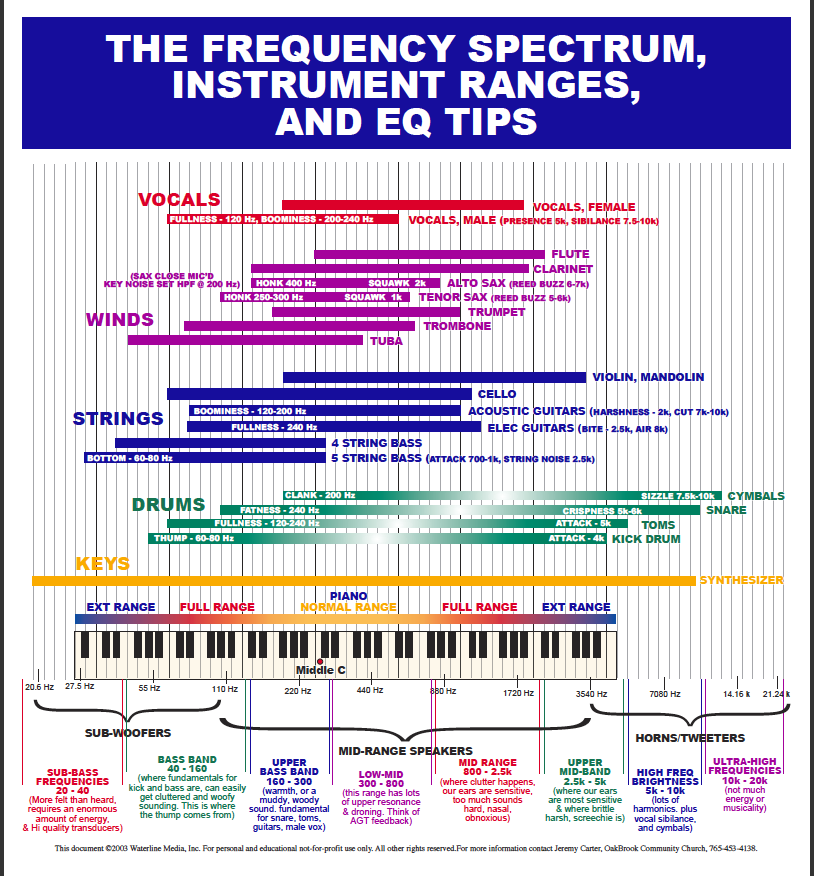
Photo source: http://www.online-mixing.com/2012/08/the-frequency-spectrum-instrument-ranges-and-eq-tips/
UPDATE: VASHI’S 12-PACK AUDIO PRESETS <— Click link to download.
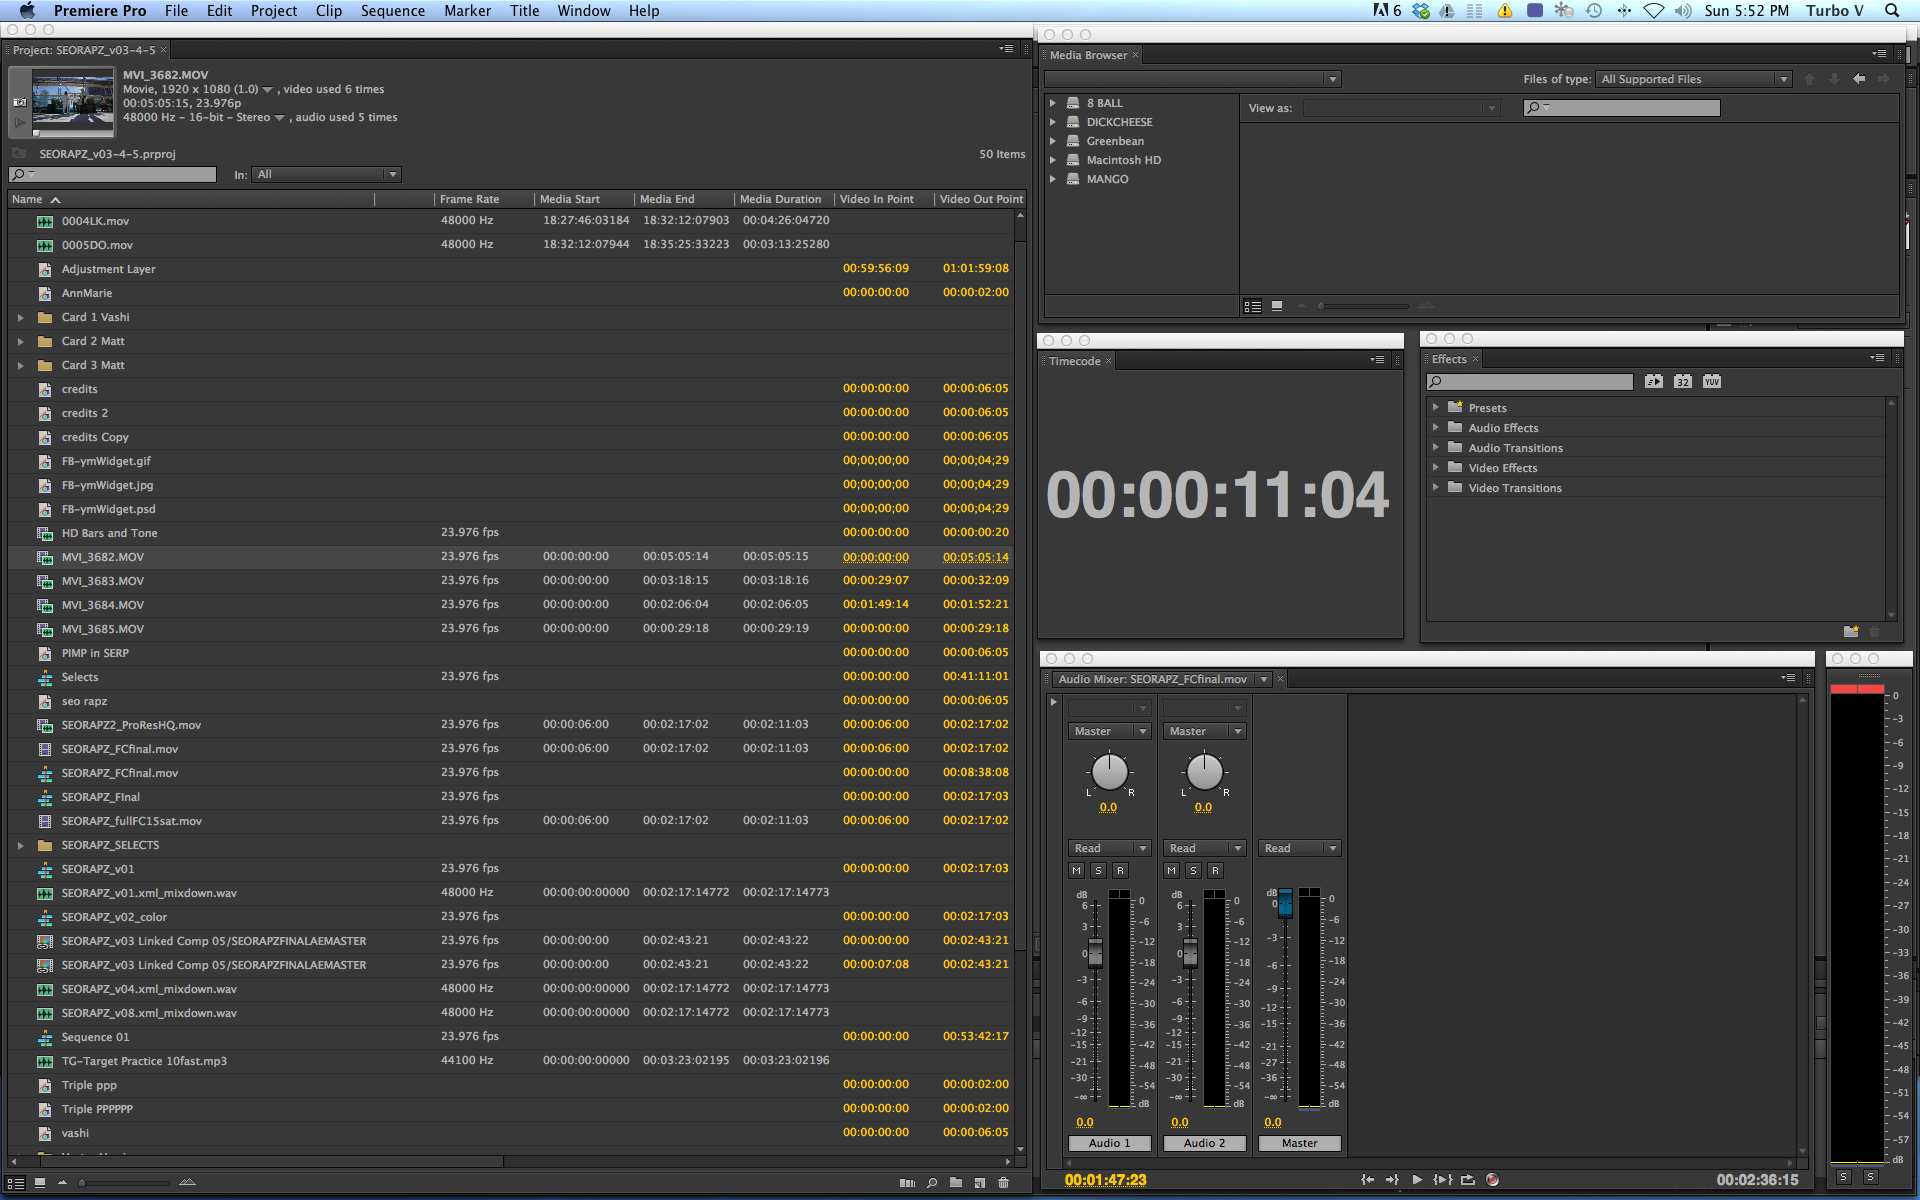
Unzip file. Inside Premiere Pro, click on the Effects Tab menu and choose IMPORT PRESETS.
12-Pack Audio Effects includes:
* Boost Dialog Clarity
* Boost Dialog Presence
* Boom Room Killer
* Dialog Brighten (add after applying Boom Room Killer)
* Dirty Phone
* Male Dialog Power
* Music Hole for Dialog
* Old Telephone
* Radio Tower Dialog
* Remove Nasal Dialog
* Thicken Female Dialog
* Top and Bottom Cut
Audio in many low budget or independent productions is often overlooked and neglectfully mishandled. The focus is often placed on capturing the perfect image with audio an afterthought. The old adage that audio is more important then image is hard to believe…until you are in post and learn that it is absolutely true.
Great visuals with crappy sound screams…“I am an amateur!” Conversely, lots of blurry, handheld, whip-panned footage with pristine dialog and a full soundscape can be completely acceptable. It will be perceived as the Director’s “artistic choice” even though shots are out of focus and flaying around. The audio is the glue that holds it together and sells it as a professional production. Embrace the Audio.
I would like to share 5 audio tips using equalization that will make your dialog, music and mix sound more professional and more cohesive.
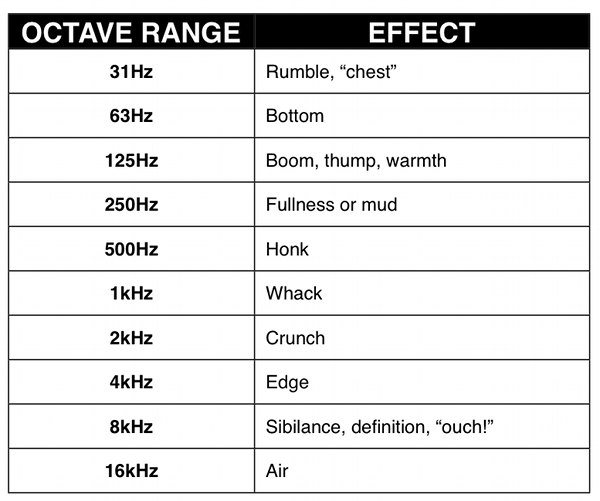
Each audio component of a mix takes up certain sonic range or frequency. If too many elements occupy the same register…your sound can become muddy, cluttered and unintelligible. Our goal will be to make each separate asset sound clear and clean.
The caveat for this is: The better your captured audio…the better the results will be.
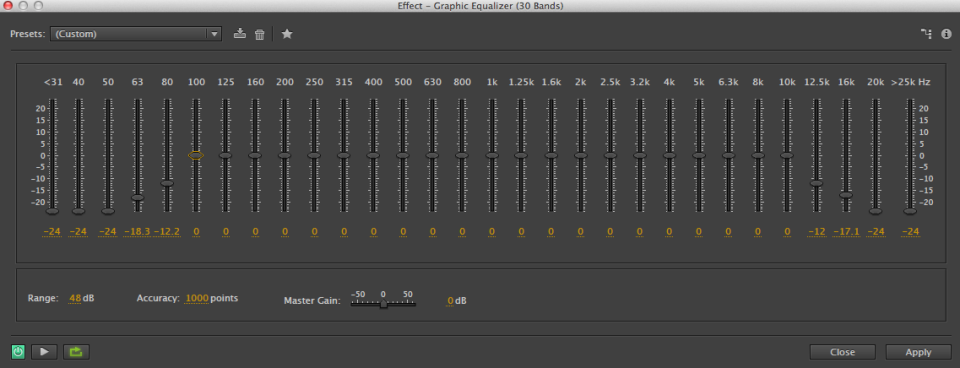
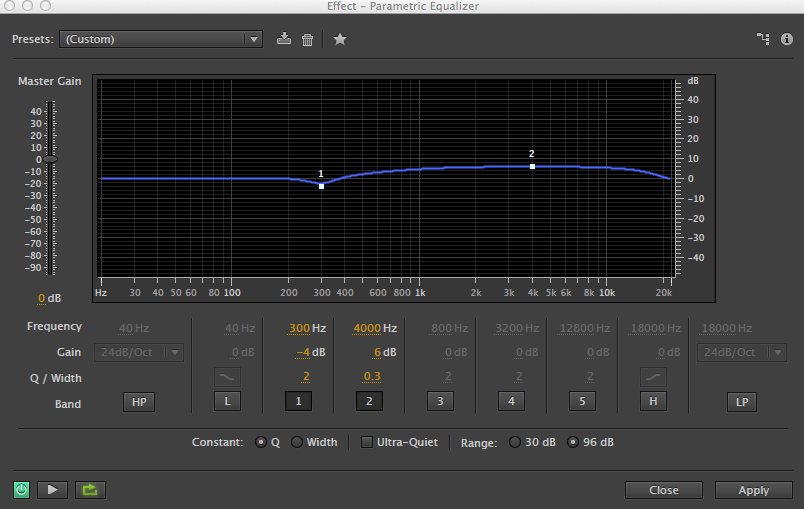
We are going to limit ourselves to only 2 common effects that every NLE or audio program comes with. First is a 30-band equalizer and second a Parametric EQ. The 5 tips below are my basic personal recipes and only a starting point. I hope they help make your audio sound cleaner, fuller and better.
TIP #1 – Cut the Top and Bottom
Dialog that comes into my edit bay is recorded on: lavaliers, shotguns, hyper-cardioids, ribbon mics or even iPhones. They all sound different, so here’s one way to bring them all into a similar sound zone. I roll off all frequencies below 100hz to remove rumbles, hums, wind and other low-end noises. At the top end I roll off everything above 10khz to remove sizzles, squeaks and high-pitched noise. I slope the cut-off with the other frequencies so it creates a “shelf” which quickly eats through the frequencies I don’t want to hear in my final mix.
TIP #2 – Saving Distant and Dull Dialog
Often the mic will be too far from an actor and you will hear boomy, reverby dialog. It’s horrible. At this distance it will also sound flat and dull. This is one of the hardest things to work with and often ADR (looping) is the only way to remedy the problem. I try this 2-step recipe to try and save the dialog. First apply a Parametric EQ at 300Hz with -4db and a Q=2. This can remove some of the “room boominess”. The second Parametric EQ at 4kHz with +6db and a Q=.25 will brighten up the dialog. Even a slight improvement will make the entire mix sound better. Also…I like to EQ dialog while the music, background sound and room tone is playing. If you solo the dialog and EQ in a vacuum…you won’t hear how it’s interacting with the environment and the mix.
TIP #3 – Make a Hole in the Music
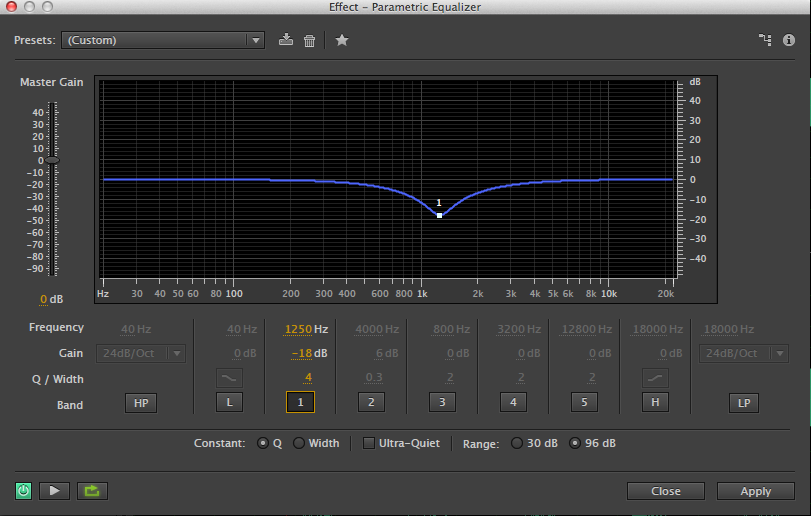
Once music or score is added to the edit, the dialog can get lost in the mix as they both occupy the same sonic space. The first step an amateur takes is to boost the volume of the dialog. Just make it louder right? This is a recipe for disaster as your mix will eventually get out of control and enter into an escalating volume war. Before you boost something…consider cutting something else first. This maxim applies to all EQ philosophies; it is the push and pull of audio mixing. Learn it and live it! So instead of raising the dialog…cut into the music and make a hole for the dialog to live in. Use the Parametric EQ at 1250hz with -18db and Q=4. This cuts the music frequencies that are in the heart of the human voice range. Notching out and lowering is a much more elegant solution than boosting and avoids the volume Armageddon.
TIP #4 – Secret Sauce Tweaks
Often the dialog will have one glaring problem that needs addressing. Most software has presets for noise reduction or hum removal but not for specific fixes. Add the fact that male and female voices cover different ranges and you can see why no preset can solve it. Here are several specific tweaks that can help you conquer these issues.
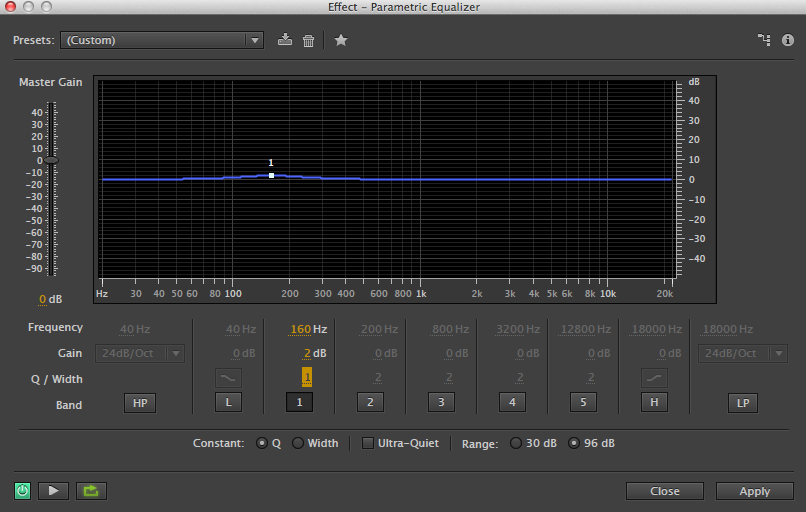
*Add Male Power = Parametric EQ at 160Hz with +2db and Q=1
*Nasally Dialog = EQ reduction between 2kHZ to 4kHz by several db
*Add Female Thickness= EQ boost at 150hz by several db
*Add Vocal Presence = EQ boost at 5kHz by several db
*Female Sibilance Reduction = EQ reduction at 6kHz to 8kHz (find it)
*Male Sibilance Reduction= EQ reduction at 4kHz to 6kHz (find it)
*General Dialog Boost = EQ boost at 2.5kHz by 3db
TIP #5 – Your Ears are the Ultimate Judge
The bottom line is If it sounds good…it is good. If you try my recipes and they work, that’s great! If they magically don’t solve your issue remember this. They are a great jumping off point into the audio jungle where so many factors (mics, distance, room type, background noise, preamp, recorder) are thrown into the gumbo. Your ears will tell you if it’s working even if the numbers don’t match up. Every sound guru I’ve worked with had their own secret sauce recipes but they all fall into very similar slivers of audio frequencies.
It takes years of working with audio to sense it and feel it…aside from just hearing it. Trust your ears. That said…make sure you don’t fatigue them by mixing for 12 straight hours while you constantly change the master volume on your speakers. This fluctuation keeps rebooting your base line of volume and aural sensitivity. Best to walk away if you get frustrated or tired and come back fresh.
A well-balanced mix with crisp and clean dialog that blends seamlessly with the music is a beautiful thing to behold. It takes as much work and time as the picture edit and the results can elevate your project to a soaring level of excellence and enjoyment. Take pride in your audio and make that shit sing!Thank you for letting me ramble and I hope you learned at least one thing after investing your time and reading my blog. Until next time…

There are 17 comments
Thanks some really useful audio tips shared.
Thanks so much. Often times the smallest tweaks can make a huge difference…especially when great audio can make any project feel so much bigger and better.
[…] here is the Link to the Blogpost from Vashi Nedomansky about 5 Audio EQ Tips for Filmmakers: https://vashivisuals.com/5-eq-audio-for-video-tips-for-filmmakers/ Like this:Like […]
[…] https://vashivisuals.com/5-eq-audio-for-video-tips-for-filmmakers/ Like this:Like Loading… […]
Really great post Vashi. I learned a lot, and I thought I already knew most of this stuff. Great practical tips where other blogs give generalities or theory but not settings or real world examples. These are great starting points for learning to think about sound as a spectrum. Good stuff!
Thanks so much Brian for the kind comment! Miss hanging out and cutting some amazing shit at Bandito Brothers. Audio is just as important as video and having the tools and knowledge to make it happen are essential for every editor. Every little tip and trick helps to make the final product more polished and more easily digestible. More to come!….
I thank you SOOO much for this tips!! Is the right “get-to-the-point” stuff that video editors need.
Audio theory is way too complicated and abstract when you are in a hurry and need get concret things done!
When I saw the first big “Frecuency Spectrum” infography, I thought to myself “Man! this IS what I need to know, explained in plain language and ready to solve concrete issues”!
BTW, I’m still thrilled by the Pancake Timeline Premiere. I hasn’t already used it, but I’m sure is a brilliant “time saver” method! So, I Thank you too for that!
Best greetings from Córdoba, in the south of Spain!
Thanks for the kind words CreativeJ! I’m thrilled you enjoyed it. All the best to you in Spain!
Hi Vashi!
Brilliant article! Thanks for sharing! Loving the Blog as well.
One question I’ve always had, while editing audio on my Laptop, is what level to set the computer volume at?
I’ve always set the the computer volume to half-way, wether monitoring with headphones or with the laptop speakers… I don’t have proper monitors yet.
Cheers!
Vibol
Thanks for the kind words and good question Vibol. If you don’t have proper monitors yet then I suggest a headphones over laptop speakers. No bass on the laptop speakers will give you an inaccurate sonic mix if you are going to TV, broadcast or big screen. For web delivery…whatever sounds good to you is probably fine. I use my Sony MDR 7506 for mixing on the road.
The best advice for levels is to watch your audio monitors (visual peaks). Shoot for dialog/normal scenes to play out at -18 to -12db and have your loudest moments hitting -3db so their is no distortion/clipping. Some more excellent and inexpensive tips can be found here… http://www.microfilmmaker.com/wordpress/2012/05/audio_tips_every_filmmaker_need/
Hope that helps and best of luck!!
[…] Since 95% of the dialog was captured with lavs, I didn’t have to use heavy EQ to match boom mics with the lavs which is an art in itself! The additional 5% of dialog was voice over done by Jon Polito, who played the articulate villain in the film. This was captured by an OKTAVA MK-012 hypercardiod and RODE NTG-2 shotgun and required only minimal adjustment. For more info about my EQ and audio secrets, check out these 5 EQ audio tips. […]
Such a great post and for something I’ve been struggling with for awhile. I’ve been adding a lot more audio hardware to my post studio so I can provide better results to clients who can’t afford a full mix session, but I’d be lying if I knew what I was doing beyond riding levels and layering effects. It’s hard to find some no-nonsense tips that are geared towards filmmakers instead of musicians.
[…] https://vashivisuals.com/5-eq-audio-for-video-tips-for-filmmakers/ Share this:TwitterFacebookGoogleLike this:Like Loading… […]
Thanks for this tutoria. This is super helpful for someone like me who has been doing video for years but never fully understood the different audio tools at my fingertips.
Thanks Allan. I’m glad it helped out at least a bit!
[…] https://vashivisuals.com/5-eq-audio-for-video-tips-… […]
Hi
Thank you for your presets and tips. I got only five presets when i imported into Premiere pro