

My timeline for the $20 Rap Video
In Part One of my behind the scenes look into the production of “PIMP in the SERP,” I exposed how we prepped and shot the video with no budget and only 69 minutes of access to a downtown Los Angeles skyscraper.
In Part Two, I want to walk you through the post-production workflow of how I cut, colored and accomplished the sound mix in 4 days.I would like to share 5 Adobe CS6 editing tips that will save you time, energy and hopefully a couple brain cells as we all know how strenuous and taxing low budget productions can be! I’ve been using Adobe Creative Suite almost exclusively for the past several years and will focus on how I use Adobe Premiere, After Effects and Audition to speed up my workflow and get high quality results in the shortest time possible. I don’t want to be cooped up in my edit cave too long…there is a world out there that I would like to see while the sun is still up! The project will still be there when you come back…have no fear.
-
- TIP #1 – BINS, BINS and MORE BINS.
The best way to have an effective workflow is to organize your project. The time you spend up front will be paid back tenfold once you are buried deep in the edit. Bins are your friend. Make a lot them. Make a few more. Try not to float assets in the project window, as it will bite you in the ass. One of the biggest time-sucks is hunting down one rogue file that is hidden amongst dozens, if not hundreds of multi media files with different extensions and version numbers. Your eyes will bleed and your brain will turn mushy after one too many “needle-in-the-haystack” endless searches.

Organized bins
Make bins. Stuff files in appropriate bins. Repeat. Maintain sanity.
Here is a link to my Adobe CS6 Premiere Pro Template (below) that I use every time I start a new project. It’s very simple, clean and numbered. The 7 Master Bins cover the basic categories needed to organize any project while editing in Adobe CS6. Things are no doubt about to get clutter crazy…so why not give yourself a fighting chance early. I number the bins for two reasons. First, if I share the project with assistants, it’s easier to confirm the right bin or location is being used. Every clip, sequence, cut, file has a number attached to it so that keeps things consistent. Second, and more importantly, you can rearrange the bins in the order of your preference without relying on alphabetical order. Set them up anyway you want. Boom. Done.

I use 7 master bins
-
- TIP #2 – THUMBNAIL YOUR FOOTAGE
We are visual creatures. We can process symbols, images and colors faster than words. Our brain makes the leap for us without needing to decipher letters or text. A bin full of similarly named text-based shots will overload your coconut almost immediately. It has to take in the whole phrase before deciding which is the right one. Scanning a full bin of text upon text will fatigue you if not in minutes, than most assuredly by lunchtime. Mmmm…lunch.

Thumbnail your footage
Editing is a marathon, not a sprint (expect when the deadline is looming) so use the CPU in your head efficiently. Staying sharp over long periods of time is a trait of the most successful editors. I choose Icon view over List view every time. In Premiere, you can resize the thumbnails to fit the bin relative to your screen size. Smaller for laptop edits (ARG! I hate thee!) and larger for desktop systems and dual monitor set-ups. You can also use the “Hover Scrub” feature to pick the Icon frame that you want. “Right Click” on the clip and choose “Set poster frame”. Usually the default image will give you enough visual reference to see what you need…but it’s nice to have the capability to be more specific if needed.

The biggest reasons I use Icon/Thumbnail mode is speed. I edited the feature film, “An American Carol”, for director David Zucker (Airplane!). I learned more about editing comedy in the first week from him than anyone could imagine. His energy level is off the charts and his brain worked at hyper-speed during the 5-month post run. I had to match his tempo as he called out specific takes that he wanted to explore. He wanted to see them right away…from the last take of a scene, back to the first. With Thumbnail mode, I could easily spot the scene and series of shots he requested and jump on the last one for playback. I had previously been in List mode and I would have to playback a shot to make sure it was the right one. This was happening on a huge plasma TV above my edit station (mirroring my source/program panel) that David was viewing. He would assume if it was up there…it’s the shot he called for. Nope. I’m just hunting for the shot. He would say, “That’s not it.” I would reply, “I know…just looking for it.” Once that dialog loop of pain played out for 8 hours, something had to give. By switching to Thumbnail mode, I could visually spot the take on my monitor without previewing it on the big screen. Day 2 of the edit was all of a sudden smoother than butter…he got his shots instantly and we had more time to talk about his hero, Davy Crockett…and Woodford Reserve Bourbon. Bonus Trivia! If you pay attention…there is some form (actor or image) of Davy Crockett in every one of David Zucker’s films.
-
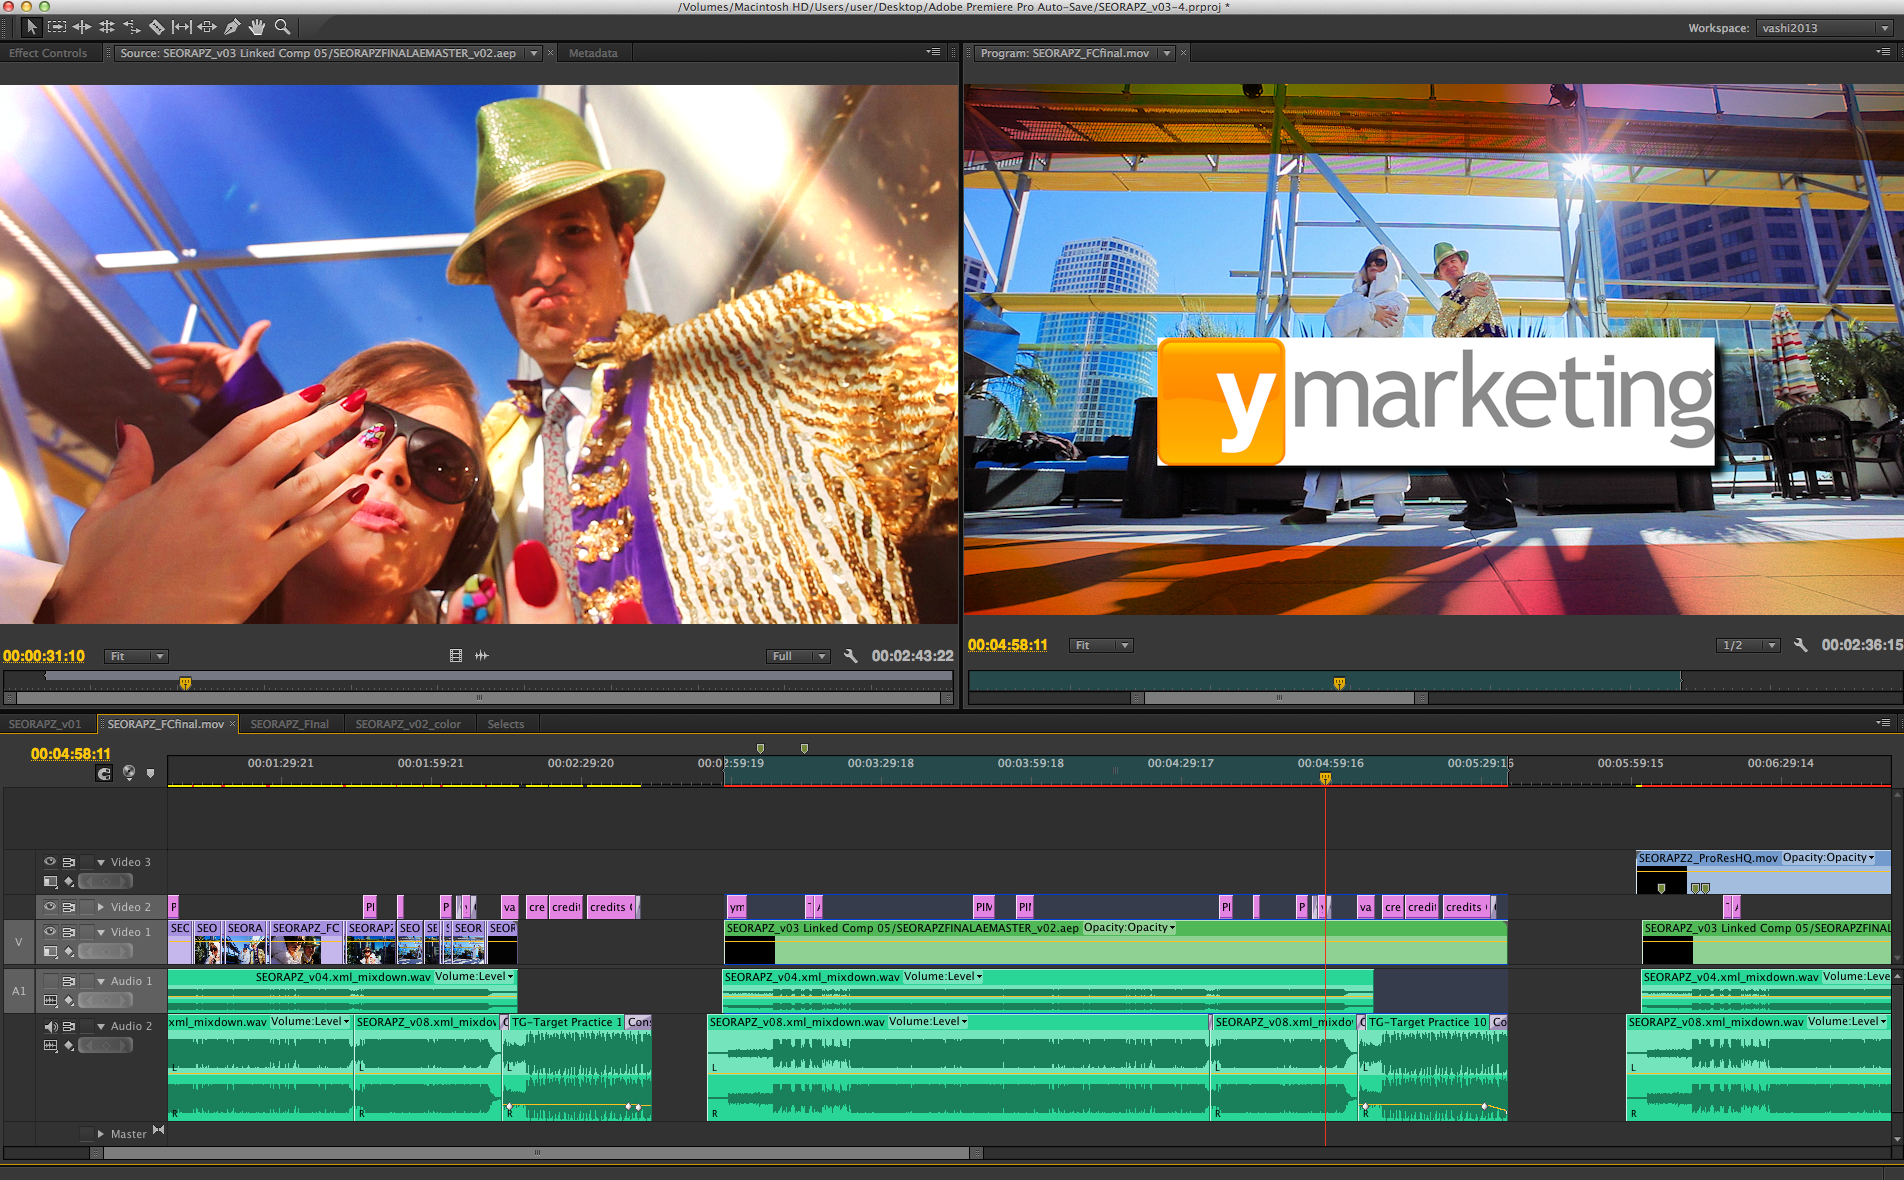
- TIP #3 – THE PANCAKE TIMELINE
This is a technique I use for dramatically speeding up my initial rough cut. With tighter schedules and deadlines kicking on your door…every little bit helps. I recently was excited as shit to watch Oscar Winners: Kirk Baxter and Angus Wall utilize the same method. I call it…The Pancake Timeline.
On projects with gargantuan amounts of footage…the editor (or assistant) must plow through hundreds of hours and pluck out the selects. Selects can be any shot or take the editor deems worthy to contribute to the story. It can be a great read of dialog or a sideways glance in-between takes. Whatever works. Specific selects are usually called star or circle takes (“good” takes as noted by the script supervisor) and all these shots together are used to build the rough cut. As an example…“The Social Network” had 324 hours of footage and 281 hours of selects. “The Girl with the Dragon Tattoo” had 483 hours of footage with 443 hours of selects. Holy shitballs. If the Pancake Timeline helped Kirk and Angus…it can surely help you. Here it is…

As is often the case…simplicity allows for quantum leaps in productivity. By stacking 2 timelines on top of each other…an editor can now access an entire reel of selects in chronological order (or whatever order desired) and instantly drop them into the active timeline below. To accomplish this layout…first open both timelines by clicking on them in the Project Panel. Drag the Selects timeline tab and hover over the top quarter of the Master timeline. Once it turns a purple color, release the tab and you’re in Pancake Land! By not having to bounce between tabbed timelines and using copy/paste…the process of analyzing and deciding which shot makes it into the cut is streamlined and intuitive. You can playback the Selects timeline in the program panel or hit the “match frame” keyboard shortcut and play it back in the source panel. Then just insert edit or drag-and-drop the shots you want into the Main timeline. Another very nice feature of this edit workflow is that the shots you pull from the Selects (top) timeline remain in their original position and are duplicated into the Main (bottom) timeline. Big Boom!
As soon as I tried this method…I realized I was cutting faster, smarter and always had a bird’s eye view of the project. By keeping the selects timeline (top) zoomed out…I could keep track of how much footage I had seen and what was left to preview. Mentally, for an editor, this allows you to keep a frame of reference to the sheer volume of footage. You can now, with a glance, know you’ve seen 50% of all the selects…and step outside for an Irish coffee and an e-cig. (Don’t give up all your vices at once!) Give The Pancake Timeline a shot and let me know how it works for you…
PANCAKE TIMELINE TEMPLATE for Adobe Premiere Pro 6
UPDATE: Download the NEW Adobe Premiere Pro CC Template HERE
Before I jump into Tip 4…I wanted to quickly touch on the actual color grade before the VFX was added. In my article on Shane Hurlbut’s Blog (and the most viewed article of all time on his site!), I go into depth of how I color correct inside Premiere. I applied all those tips here as time was of the essence. I prefer to do critical color correction in Davinci Resolve but because of the time constraints and the ample options in Premiere…I stayed all Adobe on this. Using Fast Color Corrector…levels and saturation were the only effects I needed to primary color grade my cut and get it ready for the VFX. The only other manipulation of the original footage was the blowing up several shots by 50%. This is usually more than h.264 8-bit can handle…but when used on close-ups and short edits it held up fine to my eyes.

-
- TIP #4 – DYNAMIC LINK THE VFX
With the addition of Dynamic Link in Adobe CS5…my days of rendering out a quicktime, importing into After Effects, rendering out another quicktime and finally importing back into Premiere…were gone forever. Praise (insert your deity of choice)!!! So much time was wasted along with the degradation of video footage. This feature alone propels my workflow into overdrive with maximum time-saving and harnessing of the powerful entity that is After Effects. I know there are a lot of options for visual FX…but every post house and student utilizes After Effects before anything else. It is the common ground that allows you to even share projects between PC and Mac platforms with no problem. I spoke about my experience with After Effects in the 20th anniversary event last month. After Effects is a very stable platform and the option for both its built-in effects and 3rd party options are staggering. Because I only had 4 days to cut/color/sound design the music video…I choose to spice up my visuals with these plug-ins on “PIMP in the SERP!”
Some of the BEST After Effects Plug-Ins:
1. Luca Light Leaks
2. Luca Sprocket Slip
3. Luca Grunge FX
4. Luca Film Leaders
5. VideoCopilot Twitch
6. Film Convert Pro
My workflow in Premiere was to send the entire locked sequence to After Effects using Dynamic Link. I always copy and paste the entire edit onto a higher video level in Premiere before I dynamic link. This allows me to keep the initial shots separate and as reference, if I need to revisit or make adjustments later. Premiere is powerful and responsive and allows me to cut almost any format on the planet in real-time thanks to the Mercury playback engine and the appropriate CUDA card…but After Effects gives me even more options as it is specifically designed for VFX and complicated compositions.

Inside After Effects, I used Luca Visual FX to help move the cut along and emphasize visual moments in the cut based on the music and my edits. I only had 38 minutes of total raw footage between the 2 cameras during our 69 minutes of security guard escorted shooting (see Part 1). Due to this fact…I choose to manipulate the footage and give it an active visual palette of streaks, flares, sprocket slips and light strobes. I went with a hyper-saturated color grade before I overlaid the Luca Visual FX…and I found that it blended together nicely and felt like it lived in the same world.

VideoCopilot Twitch has some very nice colored-strobe light presets that I used during the chorus and at the end of the song. I had the sun backlighting the rappers, so it appeared as if the sun itself was flashing and changing colors. Not too hi-tech but effective!

Lastly, I leaned on FilmConvert Pro to give the footage a film stock emulation that would further blend all my footage and VFX into one cohesive visual world. I created an adjustment layer over the cut in After Effects and applied the plug-in. Whatever is happening under the hood with FilmConvert Pro is fabulously insane! It treats the skin-tones wonderfully and gets rid of the Canon h.264 red color that is often too harsh. Inside FilmConvert, I opted for the Canon 5Dmkii Prolost camera source, FJ8563RL stock preset and 35mm full frame grain size. I dialed both the film color and grain settings to 50%. This setting, for me, added the right amount of texture to the footage without going overboard. Yes…rappers are flashing their platinum, “Boo-T” hair picks and I’m worried about going overboard. What can I do!

With all the color and VFX done, I saved my project in After Effects and all my work was updated and reflected immediately in Premiere. There is no more off-line…it is all on-line at the highest resolution and quality. The tools available to us really are amazing!
-
- TIP #5 – SONIC SECRET SAUCE – ADOBE AUDITION TIPS AND TRICKS
Back inside Premiere…My scratch track audio from the Canon 5Dmkii were already in my timeline. I then dropped in the ADR vocals that both Peter and AnnMarie recorded in my studio the day before. I had busted out my ancient and indestructible Shure SM58 vocal microphone and recorded onto my Tascam DR40 (portable digital recorder). The rappers listened to the final music track through Sony MDR-7506 headphones and recorded the lyrics line by line until I was happy with their rap-ostitude and performances. To hear the diabolical internet-themed rap lyrics in my quiet studio, as they focused on nailing the vibe, was a treat all by itself. Absolute commitment and fun was had by all!
I then laid down the music track under the production audio and final ADR vocals. Because I had slid and slipped the video to match audio earlier…mouths and lips were all in sync and my rappers were locked into the beat. The next step was to go again use dynamic link and this time open all the audio inside Adobe Audition. I am usually dealing with a dozen or more audio tracks in most projects…so it was a real treat to look down at the timeline and see only 3 tracks. Production audio, ADR vocals and music were represented with nice, tall waveforms.

I double checked the sync between the production and ADR vocals and was able to use the big waveforms and the sampling power to make micro adjustments to timing and make it spot on. Inside Premiere you can switch to “Audio Time Units” which is more precise than video frame rates…just as inside Audition you can trim and adjust up to 1/48,000th of a second. I sincerely hope I never have to make that fine of an adjustment! But I know…somewhere out there…one day a producer will ask for that. As long as it’s on a full rate gig…go ahead producer person…ask for the moon! I will deliver it. To process the vocals, I used 4 effects in this specific order.
1. Izotope RX – noise reduction
2. Audition 20-band graphic equalizer
3. Audition hard limiter
4. Izotope Ozone 5 – mastering
First, I used the Izotope RX plug-in to denoise the vocals. I’ve used this plug-in on 4 feature films and on every project with dialog. Due to the quick turnaround of 4 days…I chose Izotope RX even though Audition CS6 has equally impressive and thorough noise reduction capabilities. The latest incarnation is leaps and bounds better and has a cleaner interface than the previous version. I will have to run them head to head at some point…but I was more familiar with Izotope RX and cranked it out in short order.

Once the vocals were clean, I applied the Audition 20-band Graphic Equalizer to run a high and low pass cut. I cut everything under 100Hz (rumbles) and everything over 10,000KHz (sizzles). That’s a conservative range and usually gets rid of any objectionable frequencies while not affecting the human voice. I then slid the 5.6K slider up by +5db to give the midrange more legibility and pop. I felt that was all the vocal frequencies needed, to be heard clearly above the music.

Next up for the vocals was the Audition Hard Limiter. I prefer the limiter to a compressor, which can squash the voice if over-applied and make it sound unnatural. Now that I had clean, sparkling dialog…the Hard Limiter was employed to automatically set a chosen peak volume while bringing up the volume of the quieter passages. There was no danger of noise being amplified as Izotope RX had eradicated it earlier. I used the Audition preset “limit to -6db”. This ensured no vocals would go higher than -6db. The default input boost of +3db brought up the quieter passages and made the vocals live in a more defined sonic space. What this accomplished was strong, clear vocals with no discernable noise.

The next to last step was to master the audio. Just like the final video footage was crafted to feel as if it existed in one world…the same strategy was used on the audio. I called upon the Izotope Ozone plug-in to put the icing on this shimmering Rap Cake. I am not ashamed to say, that I dug into one of the numerous Izotope Ozone presets and chose…the Hip Hop Master setting. Thank you technology! This preset emulates the EQ settings of popular rap songs and raises the overall perceived volume while not allowing any clipping. It produced a tight, full, loud, crisp mix. This Adobe Audition audio mix had just been boom-nastied!

I saved my work in Audition and using the Export option, chose Multitrack Mixdown, Entire Session and picked the Wave PCM 48KHz, Stereo, 32-bit option…uncompressed and floating point.
The final step was to marry the final audio mix with the picture in Premiere. Because the audio file was the same length (thanks to dynamic link) it was as easy as plopping the track under the existing audio and then muting the temp dialog and unmixed music track.
I exported the master using the Adobe Media Encoder preset of Vimeo 1080p 23.976 (h.264) and bumped up the bitrate to 10 and the audio to 48Hz. This is my preferred setting for web delivery.
Thank you so much for taking the time to read my ramblings and I hope this article was able to open your eyes up to some helpful tips and techniques. Please feel free to share any tips you have used or experiences with the software that I utilized in “PIMP in the SERP!” Leave me a comment below!
Originally published February 16, 2013 and updated April 19, 2018.
Until next time!
There are 38 comments
great insights vashi!
thx for that… especially tip #3 was amazing.
i am a media composer editor and one thing i missed the most in premiere is the “toggle source to timeline” function.. so this was a revelation to me!
but you might also wanna take look a the following link and especially at tip #6 😉
http://www.premiumbeat.com/blog/premiere-pro-tips/
ps: sorry for the contact email.. it should be a comment.. it’s late over here -.-
Thank you Sebastian for your kind words. Much appreciated. Good link too…a lot of great info. I will be having many more articles and tips coming soon. Check back in when you can!
Great article and breakdown of your workflow. I especially like the pancake timeline tip. I remember seeing that in some training I watched on FXPHD but I definitely need to utilize more. Would help with selects and more. Keep the articles coming.
Thank you for the comment and for visiting my site. Many more articles, tips and blogposts coming soon! Keep checking in and spread the word if you enjoy the content! All the best…Vashi.
Excellent article. Although one tip: you can have subframe audio editing in Premiere Pro. You need to open the timeline panel menu, and choose “Show Audio Time Units”. Then you can make your audio edits accurately up to the sample level, like you can in Audition.
Thanks for the commment Bart. You are absolutely correct and I will update the blog to reflect that. Slipped through the cracks. Great catch! Thank you.
Hello again Vashi! You are to be commended for your innovative “pancake” technique. I love it. I used to stack all selects at the end of the timeline and have to jump back and forth which was kind of awkward. This new approach is a real paradigm shift in editing. Nice job!
Tom thank you for the kind words! I’m glad you found it helpful and I hope it saves you time and energy. Every minute you can save helps us finish our cut and our day sooner. More time to enjoy life after the work is done!
[…] #PremierePro tips/tricks are absolutely GOLD! Check ‘em out! vashivisuals.com/adobe-cs6-5-ed… — Karl Soule (@KarlSoule) February 21, […]
Thanks for the tips Vashi!! Really loved the lighting in your video. Nice tutorial.. Bookmarking it for our next videos!!
Thank you for the kind words! Glad you enjoyed the tutorial and the lighting. One bounce card and the side-angle afternoon sun can be more effective then people think! More tutorials coming soon so please stop by again!
Fantastic information again Vashi. Very thankful for all these tips.
Impressed that you can handle audio and mastering as well (although with preset here 😉 – looking fwd more to those posts. My question is about sound levels in premiere pro 6. Is it possible to have a greater sensitivity slider for audio levels? The options of markers of the audio clip itself makes only for very sharp adjustments and changes are all to steep.
What settings in camera do you use with the pp you used here? I bought the same profile but I’m not sure which settings to apply in camera.
Thank you for such an amazing blog!
Hi Jonas and thank you very much for the kind words and support. In answer to adjusting audio clips with more sensitivity, there are 2 things I can suggest to make it easier. I’m assuming you are making the changes in the timeline and not the audio mixer of Premiere CS6. First, grab the audio track (A1) on the left edge of the timeline and make it taller/bigger by dragging the edge of the track down. The taller the track, the slower the volume fader will move up and down on the audio clip. I expand it quite a bit so the waveform is very tall and easy to work with. The second tip is once you grab the volume line or make a keyframe on the clip…hold the [command] key down (on a Mac) while you drag the keyframe and it will move very slowly and precisely.
In regards to using the VisionColor picture profile I used in the Canon 5Dmkii…I stuck with their recommended settings of: Sharpness +1, Contrast -1, Saturation -2 and Color Tone -1. I thought it was effective and a great starting point for my color grade. The skin tones were very rich and accurate and really popped in the final video.
I hope that answered your questions and sets you in the right path for solid results in the future! I will be kicking out new tutorials after I get back from NAB so please come back and visit when you get a chance! Thank you again for your support!
Great tutorial!. Thorough, easy to follow, and detailed. Quite useful to those new to Premiere Pro and After Effects and Audition. Your video was clean and sharp, very professional and fun too. I’m going to use your set up for Premiere Pro seems like it will agreeable. I’ve been searching for a way to expedite my workflow. This simple change seems plausible. Additionally, I believe your set up for Audition may be combined and saved as a preset for future projects of a similar nature. Thanks
Thank you Fernando for taking the time to post such a nice comment. It’s very appreciated. I’m glad to have helped out and hope you will use these tips in your future projects! All the best and come back again!
Thanks for the insides into your workflow. It was a great read. I also learned about Tip3 on fxphd but hadn’t used it since (I don’t know why).
If you are doing a lot lot of conforming in AFX maybe you should take a look at this script http://aescripts.com/pre-compose-geek/ It helps stay orginzed and sane 😉 while working with lots of layers
Thanks Pascal for the kind words and informative link to fxphd. I love aescripts.com and anything that helps me stay organized and sane is a much welcomed addition! Great share!
Great article. I’m about to dive into a big music video project. I’m solid with graphic design and music production but a beginner/intermediate with video. These tips are timely as I’m getting organized and familiar with Premier workflow before jumping in. The pancake and thumbnail posters were revelatory to me and give me confidence before tackling the project. Well done. I’ll be checking out more of your blog, and the video you reference. Thanks Vashi!
Mike! Thank you so much for the kind words. It really means a lot to share techniques and tips that can help out other filmmakers. I’ve done it the hard way and the dumb way…and have finally worked out methods that make my work more efficient. I’m glad it helped out and hope I have more info you can use in the future! All the best…Vashi
Vashi, great post. I love the idea of the pancake timeline but I dont understand how you can keep sync for a music video. When I drag from the top timeline to the bottom the clip lands wherever I place it.?
Thanks for the support Matt. The Pancake Timeline is best used to build the rough cut and get all the shots you want into the Main timeline. Once my shots are all in…I can use waveforms from audio to slip and slide the shots to the final audio mix. I eyeball my cuts (timing wise) to the final audio using the scratch audio from the raw footage and make sure the “lip sync” is close enough. I will then adjust frame by frame using the final audio mix that is in the Main timeline. I hope that helps explain the way I like to work when sync is critical for the final edit. All the best!
… [Trackback]…
[…] Informations on that Topic: vashivisuals.com/adobe-cs6-5-editing-tips-for-music-videos […]…
baidu…
Baidu http://www.baidu.com…
[…] Bandito Brothers & Vincent Laforet. On his site, he shares his insights as well as a helpful template for Premiere Pro […]
Hey Vashi, Great article! Thanks for all your insights and supplying your Pr template file. I’m curious in your selects folder, do you create subclips when working with narrative work? I’ve always struggled with the multiple “takes” within a slated take. Example…. slate is given, talents starts dialogue makes it almost to the end and then miss speaks. Camera stays rolling and a second “take” begins in the same slated take. Thanks again for your insight, it’s always been extremely helpful.
Hi Ryan and thanks for good question. If I’m editing projects that I’ve shot I will not subclip and just put a marker at the start of the second take inside the complete video file. I will notate in the name of the file that it has 2 takes inside it and just use a keyboard shortcut to move forward to the next marker to access it. If on the other hand I am editing for a director or a client…I will always subclip so that if they call for a certain take I can visually see it in my bin as its own file and quickly navigate to it and play it out. I learned the hard way long ago that if you can’t find the right file instantly, or if the wrong file goes up on the preview monitor in front of clients…they get pissed/cranky/frustrated very quickly. Make it easy on yourself and make individual clips for each take and you will never have that issue in the edit bay. I hope that helps and let me know if you have any other questions! All the best…Vashi
Thanks for the detailed response. I totally agree trying to make it easy on yourself when your in front of a client. I’ve always tried to stay away from subclips because of previous difficulties using XML and OMF outputs of my timeline. I work a lot with dual sync sound in a mini documentary style and have really found using the export feature of pluraleyes to create copied media with the sync sound replacing the dslrs internal audio has really helped in organizing footage and fixing some issues I’ve had in the past with XML and OMF output. I’ll have to try some tests with the subclips again as it is really a great way to find specific takes at a glance. Any heads up your aware of when using subclips that I might watch for that you’ve encountered?
Thanks again for the response, Ryan
[…] all the great feedback and responses to my post about “The Pancake Timeline”, I decided to find out the maximum amount of footage that one could place into a Premiere Pro CC […]
google…
Google http://images.google.com.hk/…
[…] functions in Adobe Premiere Pro CC. And in this excellent post from Vashi Visuals, you can learn 5 great tips for editing music videos inside Premiere, including the ‘Pancake Timeline’ technique. It’s also a great read if you are […]
[…] more which you can see for yourself here. The article that made me bookmark him instantly was the 5 tips for Music Videos. In that article, he demonstrated how he was able to give professional quality to a low-no budget […]
[…] PART 2: The Post Production Process of The $20 Rap Video […]
[…] happen slightly before the end of the bar there are some useful tips on editing music videos here https://vashivisuals.com/adobe-cs6-5-editing-tips-for-music-videos – If you want to get a specific look, there are plenty of hints and tips on varioys online […]
Thanks for the great article. One question though. You wrote: “I always copy and paste the entire edit onto a higher video level in Premiere before I dynamic link. This allows me to keep the initial shots separate and as reference, if I need to revisit or make adjustments later”. What do you mean by copying and pasting the entire edit to a higher video level?
Thanks!
Hi Jan! I meant that I copy (option + select clip) and drag it up to a higher level. This means there are now 2 instances of the clip stacked on top of each other. Once you dynamic link the top clip…you always have the original clip underneath it. Hope that helps!
[…] 5 Editing Tips for Music Videos – aimed at those making music videos but a lot of good tips you can apply to just about any video production work. […]
[…] Bandito Brothers & Vincent Laforet. On his site, he shares his insights as well as a helpful template for Premiere Pro […]
[…] https://vashivisuals.com/adobe-cs6-5-editing-tips-f… […]